Instructor Ed Jones has over 30 years of experience in theindustry, has the title of MasterWater Restorer, is an Institute ofInspection Cleaning andRestoration Certification (IICRC)-approved instructor, and hasserved on the S500-2021consensus body committee todevelop the most recent standard.
Obtaining a comprehensive, detailed scope of work on a water damage loss is critical to ensure all industry standards are upheld and properly documented. The ANSI/IICRC S500-2021 Standard states, “At a minimum, the restorer should conduct the following activities during the initial response:
■ conduct a site-specific safety survey; ■ identify customer priorities and concerns; ■ verify the source of water intrusion; ■ identify the extent of the water migration; ■ arrive at a preliminary determination; ■ identify pre-existing damage; ■ identify primary and secondary damage concerns; and ■ establish dry standards and drying goals.”
After identifying potential safety hazards and taking appropriate precautions perform a detailed job scope inspection. Following the S500 guide, Accuserve recommends the following steps when establishing your initial job scope/drying plan:
1. Confirm origin of loss and obtain good photos showing what burst or leaked and any failed parts (close-up photo and overview photo showing where source is in relation to rest of the room). 2. Photograph any signs of long-term damage, continuous seepage or rot, visible microbial growth, including any dark staining or deterioration of materials (staining, swelling, falling apart). Label room & material, e.g., (Bathroom/Wall 1/Drywall Behind Toilet) that will match up with your Moisture Map. 3. Document and photograph/video any pre-existing damages (e.g., scratches, chips, cracks, tears, wear & tear, etc.) 4. Determine the category of water and record reasoning. Consider origin of loss, how long materials sat in contact with water, Conditions of structure, visible mold, dark staining, and deterioration of materials, odors, building history, and temperature in the affected areas. 5. Follow the Path of the Water – start at origin of loss and identify with moisture meters/IR camera how water moved through the structure. Take photos of readings to identify path of water and show on Moisture Map. 6. I dentify Drying Chambers – typically by level of home (e.g., main level, 2nd level, basement, crawlspace, attic, garage, etc.). Possibly 2 chambers on same level only if significant dry area between 2 wet areas or occupant ingress/egress issues. Show on Moisture Map. 7. Identify Affected Rooms, including dimensions – Label rooms on Moisture Map and show Wall 1, 2, 3, 4, etc. or quadrant A, B, C, D, etc. on affected floors or ceilings. Show where moisture readings were taken on Moisture Map. 8. List affected materials by room by square or linear feet and if material needs removed or can be dried – If a material needs removed don’t forget to take photos showing why it can’t be dried! Show any staining, swelling, deterioration, etc. 9. Create Moisture Content Record –that correlates with Moisture Map and take photos of initial readings. 10. Create Psychrometric Record – take 5 readings DAILY – Outside, Affected area in each drying chamber, Unaffected area, HVAC, and Dehumidifier Exhaust. 11. If wood flooring is affected, identify type of wood flooring (e.g., hardwood, engineered wood with plywood core or MDF/HDF core, or laminate). Follow Getting EDucated Tips for Drying Hardwood or Engineered wood flooring. Take photos of edges. 12. If cabinets or vanities are affected, take off toe kicks after confirming wet and take photos underneath to identify type of materials box made out of (plywood, MDF, particleboard, etc.). Follow Getting EDucated Tips for Drying Cabinets In-Place. 13. Determine Class of Water – after all affected materials that need to be dried are recorded. Set class of water by drying chamber. 14. List number of dehumidifiers and AHAM rating per drying chamber –take photos of initial setup and first day reading after running for at least 30 minutes. Show on Moisture Map. 15. List type and amount of air movers placed per room – take photos of initial placement and record on Moisture Map. 16. List specialty drying equipment, if needed. *Need to obtain approval for use Take photos of initial setup and show on Moisture Map. 17. Tell Your Story with Photos – that correlate to your Moisture Map, including photos of final moisture content of materials drying to prove hit drying targets. *Record Type/Brand/Model of moisture meter used **Penetrating Moisture Meter Preferred, if possible 18. Take Wet Surface Temperature Readings – if Class 4 water loss or challenging drying situation to validate extended drying times. 19. Always place containment to separate affected from unafected and to focus drying on smallest area possible. Show on Moisture Map. 20. Provide DAILY Readings until reaching drying goals. Take photos of final readings and leave loss location in a clean and organized condition.
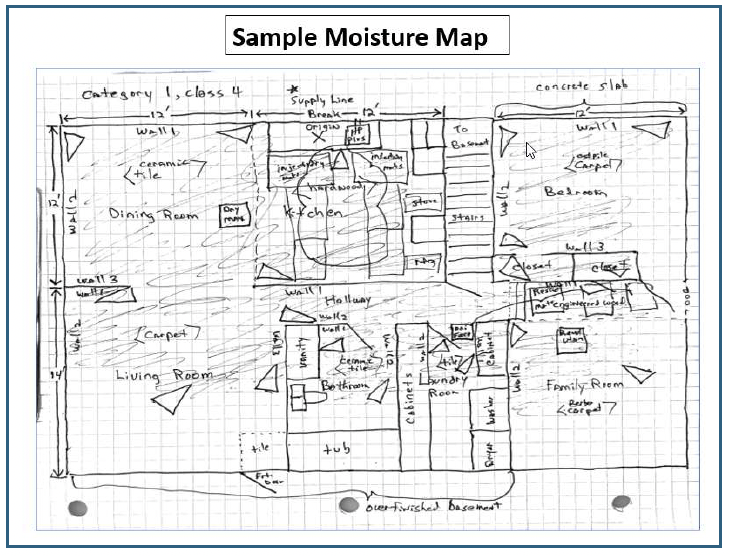
Moisture Map can just be a sketch or drawing of the affected areas showing each room with dimensions, walls labelled, initial equipment setup, with shaded areas showing the Path of the Water and dotted lines for containment. Come up with your own legend and make it easy to tell your drying story with Photos, Readings, and Moisture Map. *Take photo of Moisture Map to add to mobile app documentation
Don't forget to "WOW" your customer by having strict Customer Service Protocols, like clean, well-logoed vehicles, uniformed technicians wearing photograph ID badges, shoe protectors always worn in the home, IICRC certified technicians, showing up on time, taking care of contents, leaving the worksite clean and organized. Take DAILY Readings!
Learn to use mobile apps well to help tell your drying story.
Contractor Newsletter
Sign up today to receive quarterly tips on best practices in home repair, growing your contracting business, and more.