Instructor Ed Jones has over 30 years of experience in theindustry, has the title of MasterWater Restorer, is an Institute ofInspection Cleaning andRestoration Certification (IICRC)-approved instructor, and hasserved on the S500-2021consensus body committee todevelop the most recent standard.
Workers who remediate sewage damage losses are at risk to bacterial, fungal, viral and parasitic diseases. Over 120 different viruses can be excreted in human feces and urine and find their way into sewage (Straub et al, 1993). Technicians should always be properly trained, wear proper Personal Protection Equipment (PPE), and cover all body exposures prior to entering contaminated areas.
Restorers shall develop a safety plan outlining how workers will be protected against hazards. Restorers should take appropriate steps to disclose known or suspected contaminants to other materially interested parties and recommend appropriate precautions. If a pre-restoration or pre-remediation assessment is needed, then an independent specialized expert who meets the description of an indoor environment professional (IEP) should be used to conduct pre-remediation and post-remediation verification as needed.
The S500 goes on to state that restorers should consider potential contamination, defined as the presence of undesired substances; the identity, location, and quantity of which are not reflective of a normal indoor environment; and can produce adverse health effects, cause damage to structure, systems, or contents, or adversely affect the operation or function of building systems.
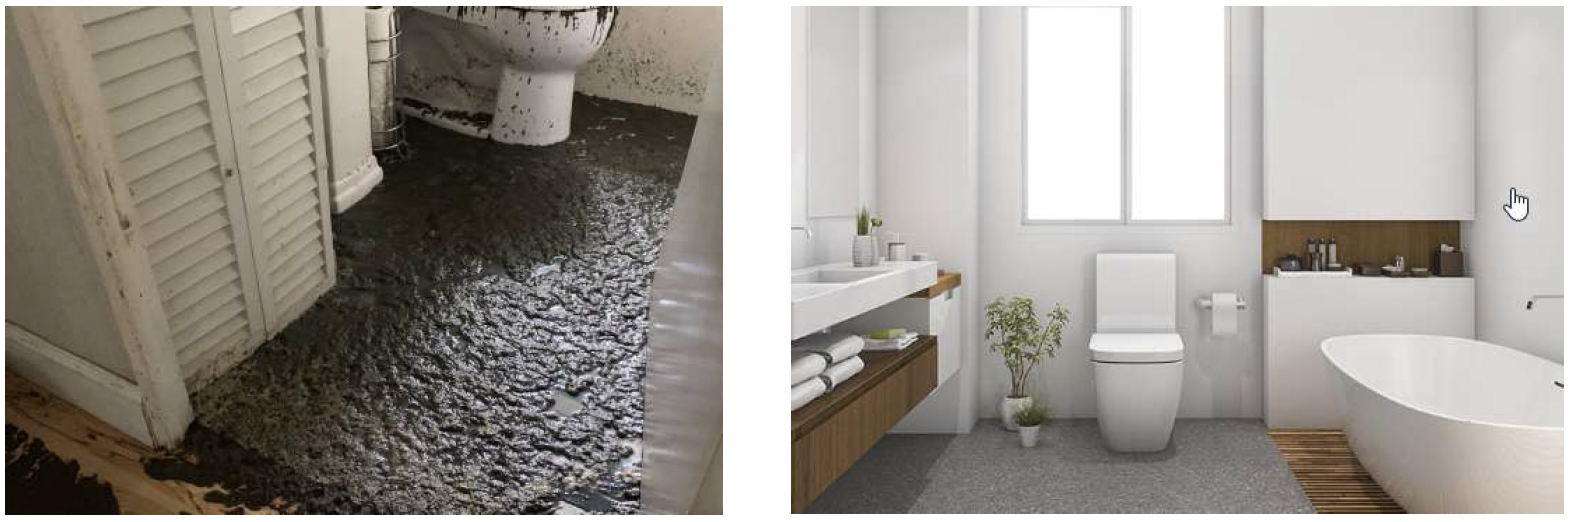
The following is a general guide of steps to cleanup category 3 sewage situations but is not intended to include ALL precautions or steps to remediate contaminated situations.
1. After initial inspection, safety plan, and scope of work has been completed and agreed to, as well as the work authorization signed, place containment to separate affected from unaffected areas and to create protected pathways through the structure to limit spreading of contaminants. 2. Consider engineering controls to keep contaminants from spreading through HVAC system by covering vents and registers and placing affected area under negative air pressure with an air filtration device (AFD). Manometer readings should be recorded to ensure proper negative air pressure differentials were reached. 3. Wearing proper PPE covering all body exposures the technicians should first remove contaminated liquids and solids, as best possible being sure to keep damage from spreading. 4. Remove any contents after cleaning to safe areas to be thoroughly inspected and cleaned if deemed restorable. Materially interested parties will need to be included in the decision making process on whether contents are salvable or not. Take photos of any pre-existing damages and keep an inventory list if removing the contents from property! 5. Remove contaminated porous materials, like carpet, carpet cushion (pad), and drywall and dispose of them by cutting into strips that can be transported in double-bagged contractor heavy duty trash bags. Be careful not to tear bags with sharp objects! 6. After liquids, solids, and contaminated porous materials removed and disposed of pressure-wash and extract until remaining subfloors and framing as clean as possible. Flush out any cracks, crevices or penetration points with pressurized water and vacuum up excess. Be sure wastewater is disposed of in accordance with local, state, and federal laws and regulations. 7. After through rinsing and cleaning, apply EPA registered biocide on affected surfaces following manufacturer recommendations. *Important signed consent form obtained from occupants and label and SDS are posted at the job site prior to application 8. Allow appropriate dwell time for biocides to work and then rinse if directed to do so on label directions. 9. Inspect one more time to ensure all contaminants removed and take photos of relatively clean surfaces of affected subfloors, walls, and ceilings. *Testing may be necessary at this point to prove surfaces are adequately cleaned (ATP testing is one option) 10. Place drying equipment in the contained area under negative air pressure and begin drying. Make sure to take photos of initial moisture content readings, as well as thermo-hygrometer readings in all affected areas.
So, in summary, tell your story in photos by photographing every stage of the cleanup to prove conditions you faced and detailing your cleanup plan, including if post-remediation verification testing should occur. Also, include photos of each affected room, before and after demolition and cleanup, and photos showing you leaving all remaining materials in a clean and dry condition that would inhibit the growth of mold and spread of microorganisms.
Contractor Newsletter
Sign up today to receive quarterly tips on best practices in home repair, growing your contracting business, and more.