Instructor Ed Jones has over 30 years of experience in theindustry, has the title of MasterWater Restorer, is an Institute ofInspection Cleaning andRestoration Certification (IICRC)-approved instructor, and hasserved on the S500-2021consensus body committee todevelop the most recent standard.
Besides my role as an IICRC approved instructor for WRT & ASD classes, I sometimes assist in identifying if the restorer dried properly or was guilty of incomplete drying or possibly causing mold. Unfortunately, this can even turn into an expensive lawsuit, so it is critical that restorers document their drying process properly. It is all about how well you build a defensible drying project file. See 6 tips below on what to include in your documentation:
Psychrometric Readings – the restorer must take DAILY psychrometric readings to validate they provided good conditions for drying and that their drying plan is working. Be sure to include DAILY readings from the outside, inside affected in each drying chamber, inside unaffected in a room close to the drying chambers, HVAC, and each dehumidifier exhaust. Don’t skip any of these because they tell a story of drying properly or not.
Moisture Content (MC) Readings – the most critical part of the documentation of all and many restorers are not good at recording their moisture content readings DAILY! Use a penetrating moisture meter, when possible and take photos of your first day and last day readings on each material and label the photos with the location where the reading was taken, e.g., Living room/wall 1/sill plate/15%/day 3.
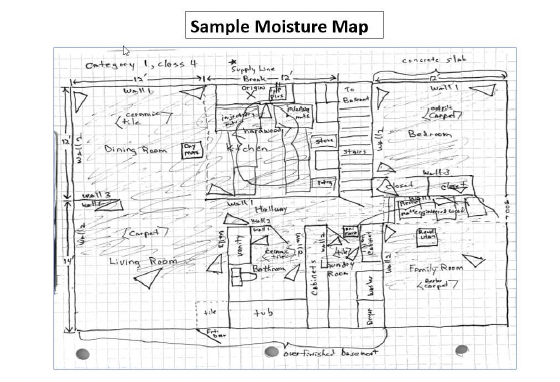
Moisture Map – the most common piece of documentation I see missing most of the time! A moisture map is simply a sketch or drawing of the affected rooms and drying chambers that have walls, floors, and ceilings labelled. If it is a wall material or sill plate label by wall as illustrated above, but if it is a floor or ceiling label in quadrants (A,B,C,D, etc.). For example, when labelling a wet floor separate each quadrant by 50-70 SF as is used by the airmover formula and if the ceiling is wet label each quadrant by 100-150 SF. Show your initial equipment setup and shade the wet areas to better show what materials got wet and which ones didn’t. Combine your Moisture Map with your labelled photos and your MC readings and you will tell a good drying plan story.
Wet Surface Temperature Readings – Again, something I rarely see, but if you study the ANSI/IICRC S500-2021 standard it clearly states that the restorer should manage vapor pressure differentials and to do this you must take DAILY wet surface temperature readings, especially in Class 4 situations or when a material is slow to dry.
The S500 states, “the vapor pressure differential should be increased (e.g., increase temperature of wet materials; reduce humidity of the surrounding air; or a combination of both).” I call it “Heat it Up, To Speed it Up!” You will need to record DAILY vapor pressure readings if you want to bill out extended drying times!
Set Appropriate Drying Targets – that are realistic and take a photo of your dry standard (MC reading of a material before it got wet) reading to show you checked it. The S500-2021 states, “When establishing drying goals to return structure, systems, and contents to an acceptable condition, it is recommended that restorers consider:
the agreed-upon scope (i.e., mitigation or restoration); the dry standard; project complexities and limitations; assembly composition and complexity; expected conditions after completion of restorative drying; prevailing or seasonal weather conditions; historical data for the region; building assembly installation requirements or recommendations; and published resources.” Like the USDA Wood Handbook that states that softwood wood framing should be dried to less than 20% moisture content to keep destructive mold growth from occurring.
Well-Labelled Photos – to better tell your drying story that combines with your Moisture Map and Drying Logs to confirm all affected materials you dried were left at an appropriate moisture level that will inhibit microbial growth. This includes photos of front of the structure, containment, initial equipment setup, thermo-hygrometer readings, initial MC readings, final MC readings, MC reading of a material that didn’t get wet, but was close to the path of the water to prove it didn’t get wet, wet surface temperature readings if Class 4 or drying challenges, before & after demolition, pre-existing damages (especially if there is pre-existing visible mold or unrelated moisture issues in the structure), amount of debris to be disposed of, PPE being worn by technicians, and any extenuating circumstances that could slow down or complicate your drying plan. Be sure to label each photo so it is easy to tell where it was in the structure and matches your Moisture Map/Floor Diagram.
Tell your story well and you will have protected yourself from allegations of incomplete drying or causing mold!
Contractor Newsletter
Sign up today to receive quarterly tips on best practices in home repair, growing your contracting business, and more.