Instructor Ed Jones has over 30 years of experience in theindustry, has the title of MasterWater Restorer, is an Institute ofInspection Cleaning andRestoration Certification (IICRC)-approved instructor, and hasserved on the S500-2021consensus body committee todevelop the most recent standard.
The ANSI/IICRC S500-2021 Standard for Professional Water Damage Restoration states that a moisture map is “documentation that visually indicates the extent of water migration in the structure by communicating the area(s) affected and immediately adjacent unaffected area(s).”
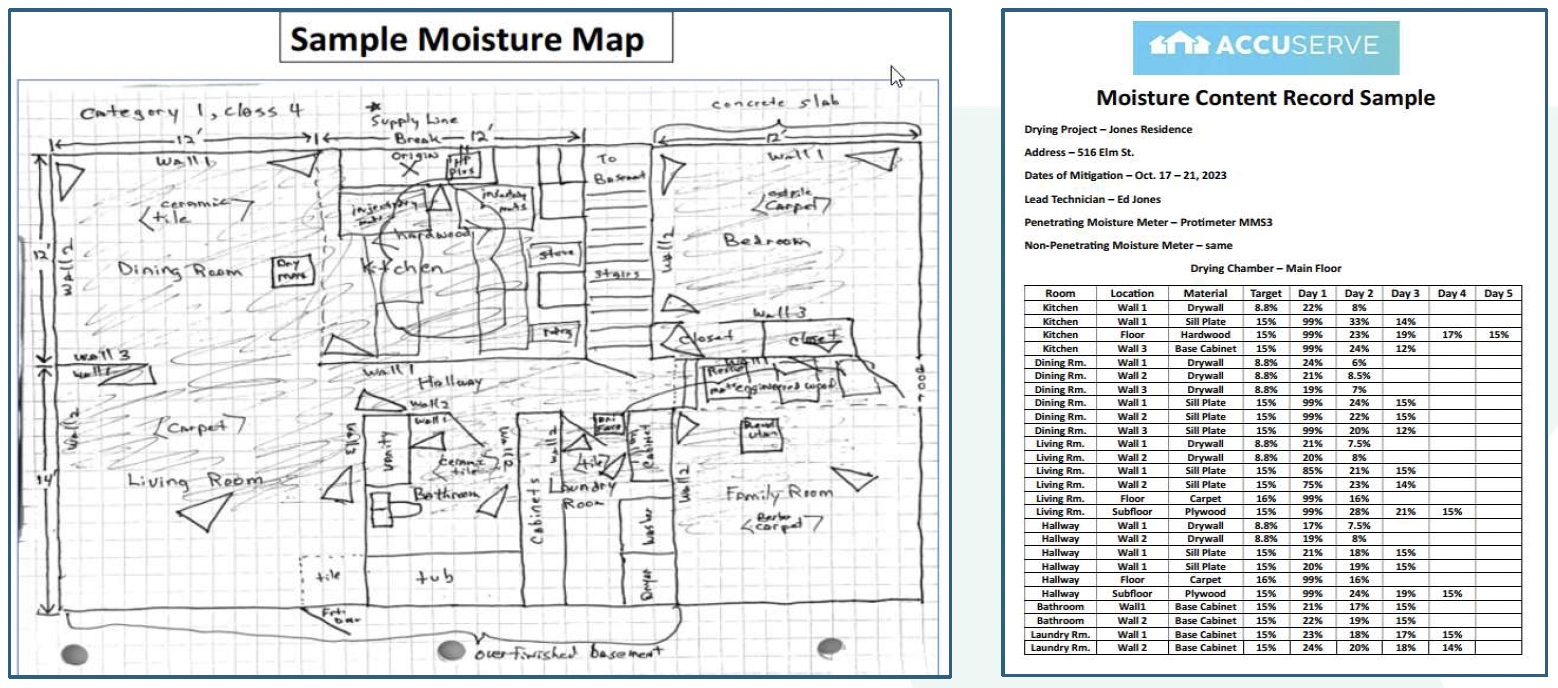
Remember, the S500 goes on to state that the term “moisture content” be used when such measurements are taken using instruments calibrated for the given material and material temperature and that the term “moisture level” be used when measuring materials with an instrument that is not calibrated for that material and only provides a relative reading that does NOT reflect actual moisture content. Most electrical moisture meters are only calibrated for wood materials, not drywall, plaster, tile, concrete, etc. so it is critical you identify Type/Brand/Model of meter used. Also, your moisture content readings should be taken with a penetrating moisture meter, if at all possible, to obtain the most accurate moisture content reading, especially with your final readings to prove you reached your dry targets and left the materials in a “safe” condition.
It’s one thing to record a moisture content reading on a moisture log, but where was that reading taken and is there enough documentation that could be used to prove that material at that location was left in a state that would inhibit microbial growth? Is there a photo of the final reading to show the dry target was reached and what date/time the photo was taken? As I try to defend restorers when there are allegations of incomplete or improper drying that caused mold it is critical we have good drying logs, including psychrometric and moisture content records, Moisture Map with sketch, and photos of readings (typically first day and final reading from each location) backed up with well-labeled photos. *See Getting EDucated Article on How to Avoid Allegations of Incomplete Drying or Causing Mold
When taking moisture content readings in residential settings and creating a good Moisture Map, I recommend the following:
Draw a simple sketch showing your drying chambers with all affected rooms and containment separating affected from unaffected areas. Shade in the wet areas and mark the origin of loss with an X. Name each room and label each wall, e.g., Living Room/Wall 1, Wall 2, Wall 3, etc. This should correspond with your Moisture Content Record and readings should be provided DAILY during the drying process. Label the floors and ceilings by quadrants, e.g., A,B,C,D and so on. I recommend making your floor quadrants 50-70 SF and your ceiling quadrants 100-150 SF to correlate with the S500 air mover formula.
Show your initial air mover setup with triangles, dehumidifier with squares, and air filtration devices with circles. You can show your containment with dashed lines. Specialty equipment can be designated in your legend at the bottom of your Moisture Map. Don’t forget to show dimensions of each affected room with ceiling heights to help validate equipment placement.
Include category and class of water for each drying chamber and be sure to have photos of containment, initial equipment setup, and first and last day moisture content readings to help tell your story of successful drying. Take a photo of your Moisture Map and include in your photos if you are using a specific mobile app or software. I’ve not found a good app so far that can create a good Moisture Map, but someone should figure that out soon, once everybody realizes how important detailed documentation is to defend you and your company, as well as all materially interested parties. I also like including initial damage photos of each affected room and final photos showing final conditions of a clean, dry work area that proves you left everything as clean and neat as possible. Before & After Photos can be very beneficial to help tell your story!
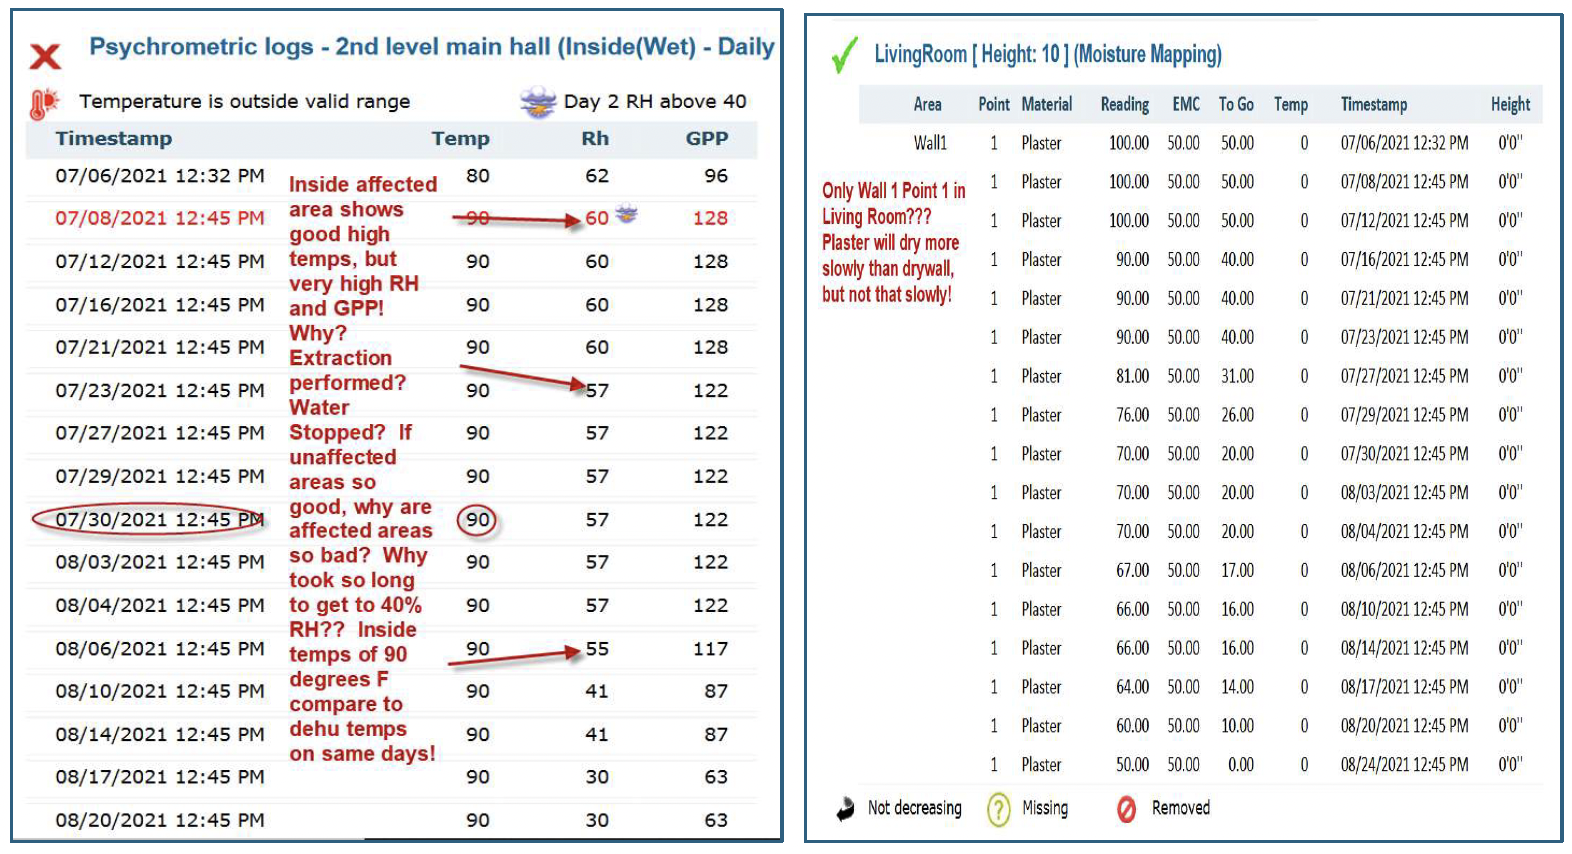
I’ve been busy teaching adjusters how to “Read the Readings” to hold restorers more accountable, but to also protect homeowners. You would be surprised to see how poor most drying logs are and it is no wonder that we see as many lawsuits as we do.
Learn to tell your drying story with your documentation of photos, readings, sketch and Moisture Map that all supports that industry standards were upheld and your drying was successful. I have learned while serving as an expert witness in lawsuits that “You are only as good as your documentation!”
I've seen too many cases where a restorer makes a small mistake, and it turns into a very expensive lawsuit with public adjusters, environmental experts, and lawyers all coming after you. Don't let that happen to you and if it ever does, be protected by having the best documentation that validates all your actions.
*See Getting EDucated Article on Help Me, Help You, by Having Great Documentation
Contractor Newsletter
Sign up today to receive quarterly tips on best practices in home repair, growing your contracting business, and more.